Are you tired of using toilet paper to clean up after using the restroom? If so, you may be interested in installing a bidet sprayer. They are simply devices that allow you to spray water for cleansing purposes. They can be attached to your toilet or installed as a standalone unit. Many people find them more efficient and hygienic than using toilet paper alone.
Installing bidet sprayers
If you’re interested in installing a sprayer in your bathroom, the first step is to choose the right model for your needs. Some come with a smart toilet suite, so you do not need to install them. For example, MyHomeware intelligent electric toilet seat cover with smart auto washer bidet has a remote control option. Moreover, they also have a sprayer with a water hose.
Once you’ve found the perfect sprayer, the next step is to install it. This process is usually fairly simple and can be done by anyone with basic do-it-yourself skills. In most cases, you’ll need a few basic tools and a few minutes of your time.
Tools and Materials Needed
When it comes to installing a sprayer, there are only a few tools and materials that you will need. Here is a list of everything you will need to get the job done:
- Bidet sprayer
- Teflon tape
- Pliers
- Adjustable wrench
Tips for installing a bidet sprayer
- First, you must gather all the necessary tools and materials. Make sure you have everything you need before starting the installation process.
- Next, you must shut off the toilet’s water supply. This can be done by turning the knob on the water supply line behind the toilet.
- Once the water supply is shut off, you can remove the old toilet seat. Use a screwdriver to remove the screws that are holding the seat in place.
- With the old toilet seat removed, you will now need to remove the old water supply line. Use a pair of pliers to remove the nuts holding the line in place.
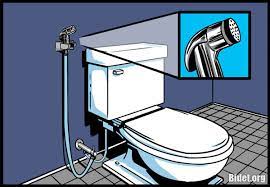
- You can now install the new sprayer with the old water supply line removed. Start by wrapping some Teflon tape around the threads of the sprayer.
- Next, you must connect the sprayer to the water supply line. Use an adjustable wrench to tighten the connection.
- Once the sprayer is connected to the water supply line, you can now turn the water back on. Test the sprayer to make sure it is working properly.
- Finally, you will need to install the new toilet seat. Use a screwdriver to secure the seat in place.
That’s it! You should now have a working bidet sprayer in your bathroom.
Conclusion
Installing a bidet sprayer is a great way to improve your bathroom hygiene. Following the steps above, you can easily install a sprayer in your bathroom. Make sure to read the instructions that come with your sprayer before beginning installation.
When selecting a location for your sprayer, be sure to consider both the placement of your toilet and the user’s height. You’ll want to be sure the sprayer is easily accessible and within reach. Don’t rush the installation process. Take your time, and be sure to double-check all your work. This will help prevent any mistakes and ensure a successful installation.